Use the Search box below to find keywords that you're looking for quickly and easily!

Thursday

Oh Those PukiFees!

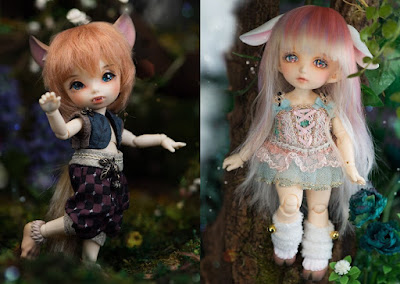
Wouldn't you know it, Fairyland have done it to me again! And . . . well you all know my weakness for PukiFees . . . this time I have bought them both!

Photos courtesy of Fairyland
Tika is a little wolf, who I have ordered in tan resin and Rin is a little sheep, who I have ordered in white resin. I shall be getting their wolf and lamb parts as well as having their default face ups, but not the clothes. I think I shall keep their names as they are, as I quite like them.

I plan on making some furry suits with the appropriate tails. :) They will make cute little spirit animals to add to my Elvin Forest, don't you think?

Monday

Introducing Ivy

My Dollmore Narsha Zihu arrived this morning and I am so thrilled with her and Dollmore's service. She was very securely wrapped and packed, better than any other doll I have received. I also received some lovely gifts which I wasn't expecting.


She came with eyes, a silicone cap, a wig, bloomers and dress. I purchased the wig, shoes & socks she is wearing from Dollmore, as well as a set of pretty blue eyes which I will change over later on today. I think the eyes she is wearing now are far too dark.


Ivy will become sister to Holly (IH KID Paige) when she arrives, and a character in my story "The House on Vine Street".

Friday

So You Want To Sew Dolls Clothes?

Many people are a little bit daunted when it comes to sewing garments for dolls, especially tiny ones. However, this is something I have always loved to do since I first learnt to sew.

Over the years I have picked up a few tips which have helped me make clothes more easily than when I first began. They have also helped to make my garments look more professional when they are finished, so from time to time I will share a few of those tips on my blog.

There are four MUST HAVES if you are going to sew dolls clothes ~

1. A straight stitch plate for your sewing machine. This helps provide a more stable base and enables you to sew fine fabrics without the feed dogs eating your fabric.

My plate has two separate holes, but some brands have three, some only have one hole in the centre. (I also use a walking foot, when sewing slippery fabrics together, this helps stop the fabrics sliding and which is normally for quilting.)

Plates cost around $20-$30, and these can be purchased online.

2. A Sewline Air Erasable Fabric Pen. These are a terrific addition to your sewing box and worth every cent! One word of warning though, you must erase the marks with water BEFORE you iron, otherwise you will heat set them.

Click here for further information.

Quick Tip: Cut your fabric after you have sewn it to avoid any frustrating tiny seam allowances. Using my pen, I trace my bodice pattern directly onto the reverse side of my fabric. Then I just cut out a square of fabric around the bodice and sew along my tracing lines.


3. A tiny iron. A full size iron is way too large and awkward for pressing tiny pieces and the tiny iron is wonderful. The Clover Mini Iron 2, boasts new temperature controls and a redesigned handle. The new slide-switch settings are convenient and easier to work with, while the safety shield will help protect your fingers from burns by preventing the fingers from touching the shaft.

Clover's RRP is a bit expensive, but most haberdashery/quilting and sewing machine stores sell them a little bit cheaper.

Quick Tip: Ironing each piece as you go (after sewing and turning) gives a much nicer finish to your garment.

4. A pair of haemostats/forceps. These make turning garments right side out much simpler to do. I use either a straight or a curved pair depending on what I am turning. They are both 125cm long.

Haemostats are usually around $12 a pair and are available at hobby shops and  online.

Quick Tip: When it comes to really tiny dolls like PukiFees and other dolls of a similar size, I tend to hand sew more often than I use a sewing machine. Especially for the fiddly bits like inserting sleeves.

I hope this post helps make sewing clothes for your own little dolls less daunting and I shall look forward to reading your comments and seeing your pretty garments on your blogs. :)
Thursday

Morning Stroll

Finished renovating another little pram today. The lining, hood, mattress and pillow are all made from Silk Shantung. The cane bassinette has been trimmed with lace and gimp and features a coordinating flower each side.


I asked Gaea to take Mossy for a walk in the pram to test it out, and Biscotti decided to join them as they wandered down Oak Tree Lane.

I have put it on Etsy for US$39 plus postage.

More detailed photos on my Flickr.

Wednesday

Little Kawaii Brooches

Today I made some My Little Pony brooches and listed them in my Etsy store.


I also made some little bows that have glittery stars inside the resin. They are US$5 plus postage. Either design can also be made as a hairclip, so if you would like one (or two) please use the contact form in the right hand column.


I wasn't going to list anything more on Etsy, because of all the changes they keep making, but it appears I can still list stuff without committing myself to a US$15 a month charge . . . well, at least for the present anyway, so I relented. :)

Halloween Outfit

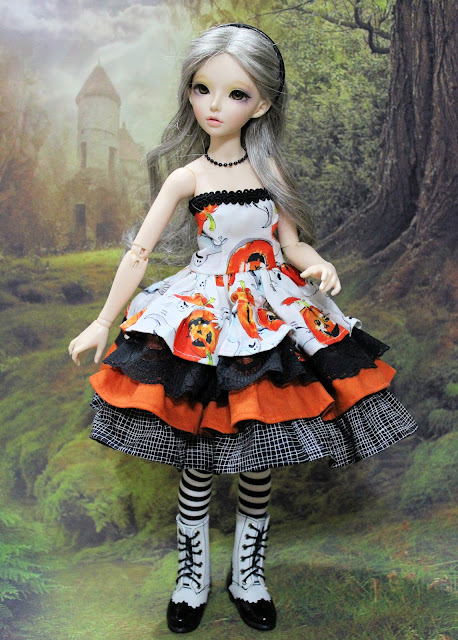
Halloween is not far away, so I designed something special a little while ago, for Nanette (Minifee Celine)  to wear.


I am pretty pleased with the finished outfit and think it will be perfect for her to wear to the Halloween Party.


What do you think, is it ghoulish enough?


Sunday

Fairyland's Fantasy

Sometimes I wonder if someone at Fairyland lives in a world of their own. After first looking at their News and finding there was another RealPuki Sira face plate being released as a PukiFee Event FP, I was over the moon and really looking forward to the Halloween Event.

However, when it came time to order and actually seeing the PukiFee Event FP. . . BLAH!! It was not a Sira after all, it looked just like any other PukiFee, I was so disappointed. So much in fact, it took the edge right off the excitement I was feeling about finally being able to finish my third fairy Linaria (Li for short). I have had her body sitting here for months, along with her beautiful wings, pretty shoes with diamante trim and floral circlet to adorn her hair.

Photo courtesy of Fairyland
Still, I have managed to console myself with a purchase of a RealPuki Papilio in tan resin. I chose to order the basic version with the addition of the winking plate and face ups done on both. This brought my balance to $300, so I qualified for the free FP, but I very much doubt if I will do anything with it.

Photo courtesy of Fairyland
I have something special in mind for this little guy when he arrives, and he will featured in a new story I am writing. Not with other RealPukis this time, but with my Narsha Zihu and Iplehouse's KID Paige (which hubby will be purchasing for me shortly).